There are many reasons and excuses for not exercising. Some of the main ones are lack of time and the high cost of both gym memberships and equipment.
We've talked about the possibility of completely replacing the gym with home workouts more than once. But what about those who need to use equipment and machines? The reasons vary: some need a specific type of training (for example, strength training); others are simply obsessed with machines, and so on. The reason isn't important, the result is important: for some, it's a convenient excuse, while for others, it's a genuine impossibility of full-fledged training.
Meanwhile, not everyone is giving up on exercise in these circumstances. Just as the gym can be replaced with workouts at home or outdoors, much exercise equipment can be made at home. This can range from a thorough build, essentially replicating industrially produced exercise equipment, designed to last “forever” and “just for yourself,” to a quick, improvised one from scrap materials. The first option is much more labor-intensive, requires a steady hand, and is usually more expensive; the second is much less durable, almost certainly looks like “something out of place,” is made from whatever's at hand, and costs next to nothing.
But it allows you to train just as well!
Let's talk about this.
First of all, we're interested in strength training equipment. Perhaps the simplest and most common of these are weights. The classics: kettlebells, dumbbells, and barbells, which are still often preferred over trendy exercise machines. Their equivalents are easiest to make from scrap materials. And what's more, from whatever's on hand: quickly and as cheaply as possible.
Perhaps, and even most likely, it's not particularly beautiful… or at all. That's not the important thing here. It's simple: the weight must weigh down properly. And it doesn't matter at all how it looks.
What does a barbell consist of? Essentially, it's a handle and weights on each end. That's it! And the weights aren't necessarily in the form of “plates.” Surely many of you remember those old-fashioned barbells with ball-shaped weights you've seen in movies?
Let me repeat: the design and overall appearance of your barbell are irrelevant. The only requirement is the weight, and the equipment itself is more or less comfortable. Therefore, we consider our financial and crafting capabilities and select the material. For example, let's take the most basic and budget-friendly option, a homemade one.
We find the future “neck” – which, in fact, is just a handle.
Simply put: a stick for holding and securing loads. Requirements: a convenient thickness, suitable length, and sufficient strength. We use pipe, rebar, a stick…
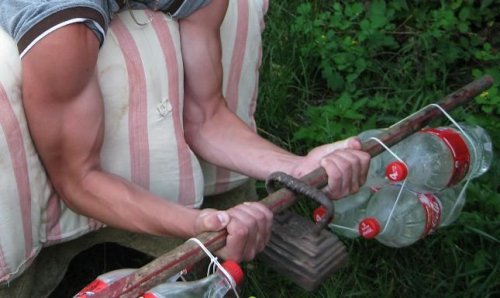
The most cost-effective cargo can be plastic bottles with a volume of 1 –
2.5 liters. Fill the bottles with sand (or, if you prefer, water) and attach them to the ends of the handle. We can secure them with strong tape, for example. Place the bottles horizontally, along the handle in a circle. However, this is up to you. You can also arrange the filled bottles into a cubic “battery.” Place the handle on top and secure.
Unlike the circular setup, the barbell will be noticeably higher—the “battery” weights are on the floor, and the handles are at the same height as the standing bottles. But if this is convenient for your particular exercises, why not?
The weight of the projectiles is adjusted by using different fillers for the containers (in our case, plastic bottles): from water to concrete.
If you have the materials and some equipment (such as a welding machine) and a steady hand, you can make pancakes from suitable metal “discs”—for example, car tires—or something similar in shape and of suitable size/weight.
Of course, there's a serious downside—you can't adjust the weight of these bars quickly. The advantages are simplicity and extreme affordability. And the ability to customize them, which can be important. For example, instead of two weights at each end of the bar, you can place one large weight in the center. Or make the bar asymmetrical by overweighting one end. Why? At the very least, to challenge muscle coordination.
A variation of the “barbell” is a log with strap-like handles attached at shoulder width. Or a pipe with welded metal handles. Again, attach the handles at approximately shoulder width. Grab the handles with both hands, lift, and get to work!
A “battery” of plastic bottles can serve as a kettlebell. However, it's more awkward than traditional kettlebells and, therefore, requires greater coordination. This is believed to provide a significantly better muscle workout.
A convenient tool is a canister filled with water or sand. Canisters also have a handle, making it easy to select the right volume (and therefore weight).
An excellent piece of equipment, one I've never seen for sale before—a clubs. Not the kind used in rhythmic gymnastics, though, but the heavy ones. For full-fledged strength training for a strong, trained person.
If you have a welding machine, the mace can be simply welded together from a suitable length of pipe (the handle) and some heavy blank (the pommel). The pommel can also be made from a larger diameter pipe, welded to both ends of the cap, and filled with sand.
If there's no welding… the mace is still made. We cut off the neck of a plastic bottle, insert the handle, and fill the bottle with cement mortar.
You can make dumbbells in a similar way. Just make the handles shorter and cut the bottles shorter so the dumbbells are more compact than clubs. But each dumbbell has two bottles. It's all familiar: cut the handles, fill with the solution, connect the two bottles with the handle, and let it set.
And probably the last of the simple equipment: a bag. Another classic tool, filled first with sawdust, then sand, and then… presumably, shot—if you have that much. No? Then just sew a new bag, a bigger one!
We lift the bag, drag it, squeeze it, throw it/catch it…